BIOS stands for Basic Input/Output System. It is the firmware that controls the basic functions of your computer, including booting, hardware configuration, and power management.
Updating your BIOS can improve your system’s performance, stability, and compatibility, as well as address bugs and security issues.
However, updating the BIOS is not a simple task and requires careful precautions. If done incorrectly, it can result in a damaged or unusable system.
Therefore, it is advisable to update the BIOS only when necessary, and to follow the instructions carefully.
Before you start, make sure you have the following:
- A stable internet connection
- A USB flash drive with at least 16 GB of free space
- A backup of your important data
- A fully charged battery or a reliable power source
Steps to Update BIOS Windows 11/10 Gigabyte

- Go to the [Gigabyte official website] and search for your motherboard model. You can find the model’s name on the box, the invoice, or the motherboard itself.
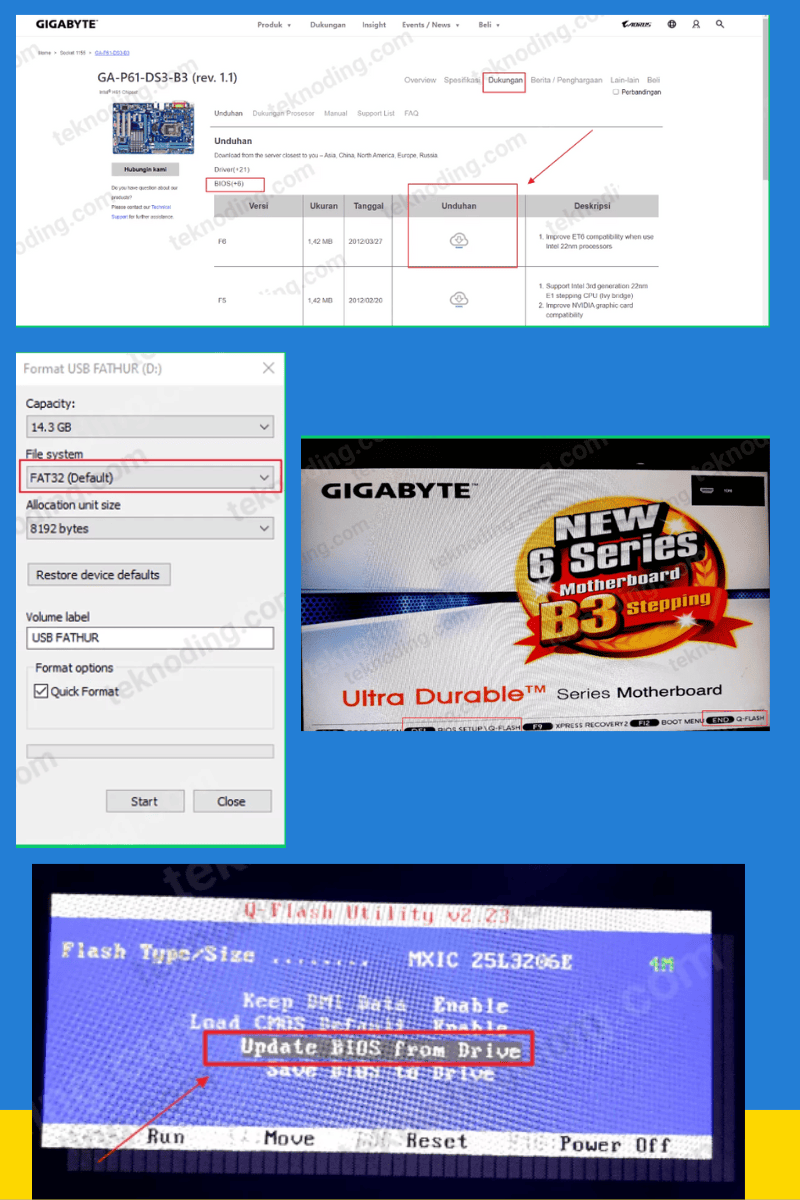
- On the product page, click on the Support tab and then select BIOS. You will see a list of BIOS versions available for download. Choose the latest one and click on the Download button. Save the file to your computer.
- Extract the downloaded file and copy the BIOS file (with the extension .Fxx) to your USB flash drive. Do not rename or modify the file.
- Restart your computer and enter the BIOS setup by pressing the Delete key repeatedly during the boot process. You will see the Gigabyte BIOS screen.
- In the BIOS setup, go to the Q-Flash option and press Enter. Q-Flash is a utility that allows you to update BIOS without using an operating system.
- Select Update BIOS and press Enter. You will see a list of drives connected to your computer. Choose the USB flash drive that contains the BIOS file and press Enter.
- You will see a list of BIOS files on the USB flash drive. Choose the one that matches your motherboard model and press Enter.
- You will see a confirmation message asking if you want to update BIOS. Select Yes and press Enter.
- The BIOS update process will begin. Do not turn off your computer, unplug the power cord, or remove the USB flash drive until the process is completed. It may take several minutes depending on the size of the BIOS file.
- When the BIOS update is finished, you will see a message saying Update BIOS Successfully. Press any key to restart your computer. You have successfully updated BIOS Windows 11 Gigabyte.
How to Update BIOS Gigabyte Motherboard 1155

Realize that the BIOS, or Basic Input/Output System, which acts as a base for hardware organization on your computer, requires updates too.
It’s not just the operating system, drivers, or software that need regular updates.
Usually, the BIOS gets updated to support new hardware components, like the latest processors.
As an example, I have an old GA-P61-DS3-B3 socket LGA 1155 Motherboard.
To make it work with the new intel ivy bridge 22nm processors, such as the Core i5 3470 series I have, I need to update the BIOS. Here’s how:
Here’s how to update the gigabyte motherboard flash bios:
- First, make sure you already know your Motherboard serial number.
- Next, Search in Google by typing the keywords of your motherboard series, for example “GA-P61-DS3-B3”.
- When you find it, click the top search result from the official gigabyte.com website.
- Next you select the Support section.
- Then select BIOS > download the latest BIOS version at the top.
- Then prepare an empty flash drive and right-click to select “Format to FAT32.”
- If it has been formatted, you copy and paste the BIOS file that was downloaded earlier into the flashdisk.
- Then, plug the flash drive into your computer and restart it.
- Press the END button to enter Q-FLASH BIOS mode or press DEL to access BIOS SETUP and then press F8.
- Once in QFLASH mode, select “Update BIOS from Drive” and choose the BIOS update file stored on the flash drive.
- First, transfer the downloaded BIOS file to a flash drive. Once in QFLASH mode, select “Update BIOS from Drive” and choose the BIOS update file stored on the flash drive.
Note: You need to note that, do not let your electricity update process die suddenly, because it can cause damage to the BIOS system.
If the BIOS has been successfully updated, now you reinstall your Windows OS.
What are the benefits of updating BIOS?
Updating BIOS can improve the performance, stability, and compatibility of your system, as well as fix some bugs and security issues. For example, updating BIOS may enable new features, support new hardware, enhance security, or optimize power consumption.
What are the risks of updating BIOS?
Updating BIOS is not a simple task and requires some precautions.
If you do it wrong, you may end up with a corrupted or unusable system.
For example, updating BIOS may cause compatibility issues, data loss, or system failure.
Therefore, you should only update BIOS when necessary and follow the instructions carefully.
How do I check the current BIOS version of my system?
You can check the current BIOS version of your system by entering the BIOS setup or using a system information tool. To enter the BIOS setup, restart your computer and press the Delete key repeatedly during the boot process. You will see the Gigabyte BIOS screen.
The BIOS version is displayed at the bottom of the screen. To use a system information tool, you can download and run a program such as [CPU-Z] or [Speccy]. These programs can show you various information about your system, including the BIOS version
This article provides a guide on updating the BIOS on a Gigabyte motherboard for PCs and laptops running Windows 11/10. Hopefully, it can be of assistance to you


