In Microsoft Word, have you ever wanted to see exactly where the edges of your text are?
This is helpful for making your documents look neat and organized. You can do this by turning on a feature called “Text Boundaries.”
Why Show Text Boundaries?
While text boundaries might seem like a minor feature, they offer several benefits:
- Precise Alignment: Easily see how your text aligns with other elements in your document.
- Layout Control: Ensure images, text boxes, and other objects are placed exactly where you want them.
- Troubleshooting Formatting: Identify potential formatting issues caused by hidden boundaries.
How to Show or Hide Text Boundaries in Microsoft Word

This method also applies to almost all versions of Microsoft Word. Examples include Microsoft Word 365, 2021, 2013, 2016, 2010, 2007 and 2003.
Here’s a breakdown of the process, covering both the latest versions of Word and older iterations:
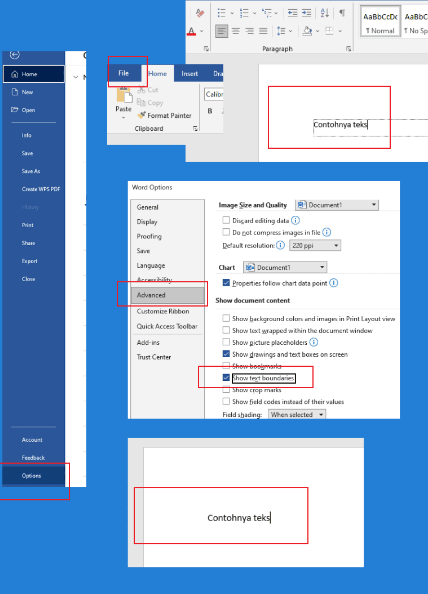
- Open the Microsoft Word application on your computer.
- Next, open the Word document file, then try typing a paragraph sentence.
- Next select the File menu.
- Then choose the Options menu.
- In the Word Options section, select Advanced.
- Then scroll to the Show document content section.
- After that, if you want to remove borders in Word, you can uncheck the Show text boundaries section.
- Conversely, if you want to show borders in Word, you can check the Show text boundaries section.
When to Use Text Boundaries (And When Not To)
Text boundaries are a fantastic tool for specific situations, but they’re not always necessary. Here’s a quick guide:
Use Text Boundaries:
- Designing layouts: Especially when aligning text with other elements.
- Fixing formatting glitches: Identify extra spaces, line breaks, or paragraph issues.
- Drafting and editing: See the overall structure of your document more clearly.
Don’t Use Text Boundaries:
- Finalizing your document: Text boundaries are for editing, not for presentation.
- Printing: Text boundaries won’t show up in your printed document.
Troubleshooting:
If you’re having trouble showing or hiding text boundaries, try these steps:
- Restart Word: Close and reopen Microsoft Word.
- Check for Updates: Make sure you’re using the latest version of Word.
- Default Settings: Go to the “View” tab and click on the “Draft” view. This might reset some view settings.
Showing and hiding text boundaries in Microsoft Word is a simple yet powerful technique that can elevate your document creation skills.
By mastering this feature, you gain greater control over your layout, formatting, and overall document design. Try it out, and see how it enhances your workflow!
That’s the information about how to remove borders in Word. Hopefully, this article can help your reference.


