Want to make your own great videos? CapCut is a super easy tool to use. It’s got lots of fun effects to try and it’s made by the same people who made TikTok!
When making videos, it’s important to get the size right. Some sites and apps like videos to be tall, while others like them to be wide.
Want to learn how? This article will show you how to change the size of your videos in CapCut so that they look great wherever you share them.
Understanding Video Size

Video size, or resolution, refers to the number of pixels that compose the video’s width and height.
Common resolutions include 1080p (1920×1080 pixels) and 4K (3840×2160 pixels). The right video size ensures your content looks sharp and engaging on any device.
Why Video Size Matters?
Choosing the right video size is crucial for several reasons.
It ensures your video is optimized for the platform it’s intended for, prevents unwanted cropping or stretching, and maintains video quality.
Whether you’re targeting Instagram stories, YouTube, or presentations, the correct video size makes your content look its best.
How to Change Video File Size in CapCut Mobile
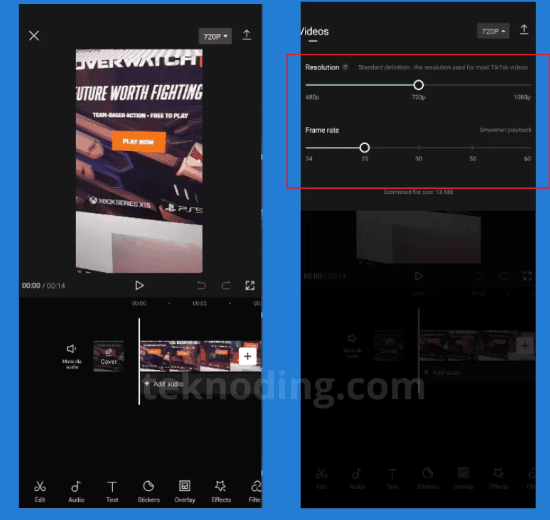
Here’s how to change the resolution and frame rate of a capcut video from your phone:
- Run CapCut app on Android/iOS devices.
- Choose New Project.
- Then edit the video in CapCut.
- Then to change the size or resolution of the video in CapCut, you can select the 720p menu in the upper right corner.
- Next in the Resolution section scroll select from 720p to 1080p capcut video resolution.
- In addition, you can also set the frame rate from 25 FPS to 60 FPS.
- After that you just export the video without the CapCut watermark.
- Later the CapCut video results will automatically adjust the settings.
How to Change Video File Size in CapCut PC
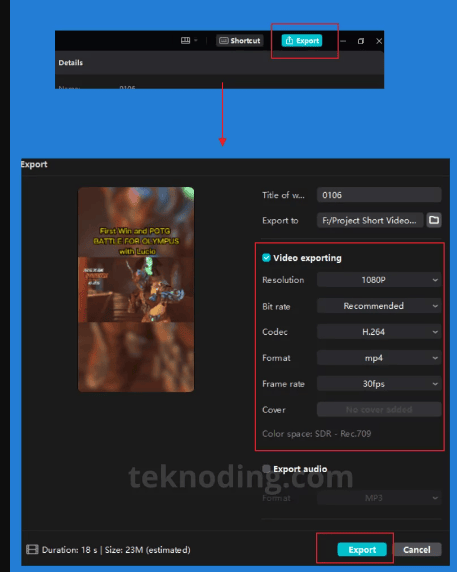
Apart from Android/iPhone phones, using the CapCut application on PC, we can also adjust the size of CapCut videos.
Here’s how to adjust the video size on CapCut PC/laptop:
- Open CapCut application on PC/Laptop without Emulator.
- Next, edit the video in CapCut.
- Select the Export button in the top right corner.
- Next, in the Resolution section, select from 720p, 1080p to 2K or 4K.
- After that, select the Export button again.
Besides changing the resolution of the CapCut video, you can also reduce the size of the CapCut video by selecting the Codec from H.264 or HEVC, and also the video bitrate from Recommended to Lower.
So that later it can affect the file size of CapCut video editing.
To select the CapCut video frame rate, you can choose from 24FPS, 25FPS, 30FPS, 50FPS and 60FPS.
FAQ
Q: Can I change the video size for an existing project in CapCut? A: Yes, you can change the video size for any existing project by accessing the Project Settings and adjusting the Aspect Ratio or Resolution.
Q: What video size should I use for Instagram stories? A: For Instagram stories, use a 9:16 aspect ratio, typically 1080×1920 pixels, for the best viewing experience.
Q: Is it possible to customize the video size to any dimension? A: Yes, CapCut allows you to enter custom dimensions for your video size, giving you full control over the final output.
Q: Will changing the video size affect the video quality? A: Adjusting the video size can affect quality, especially if you’re scaling up. It’s best to choose the highest resolution possible for your needs and scale down if necessary.
Q: Can I change the video size for YouTube videos in CapCut? A: Absolutely. For YouTube, the recommended video size is 16:9, with 1080p (1920×1080 pixels) being the most commonly used resolution for high-definition videos.
