CapCut is a powerful video editing app that allows you to create stunning videos with ease.
One of the most important elements of any video is the audio, and CapCut makes it easy to add audio and voiceovers to your videos.
In this guide, I’ll show you how to add audio and voiceovers to CapCut in a few simple steps.
How to Add Music to CapCut PC

Step 1: Import Your Video
The first step is to import the video you want to add audio to. You can do this by tapping on the “Import” button and selecting the video from your camera roll.
Step 2: Add Audio
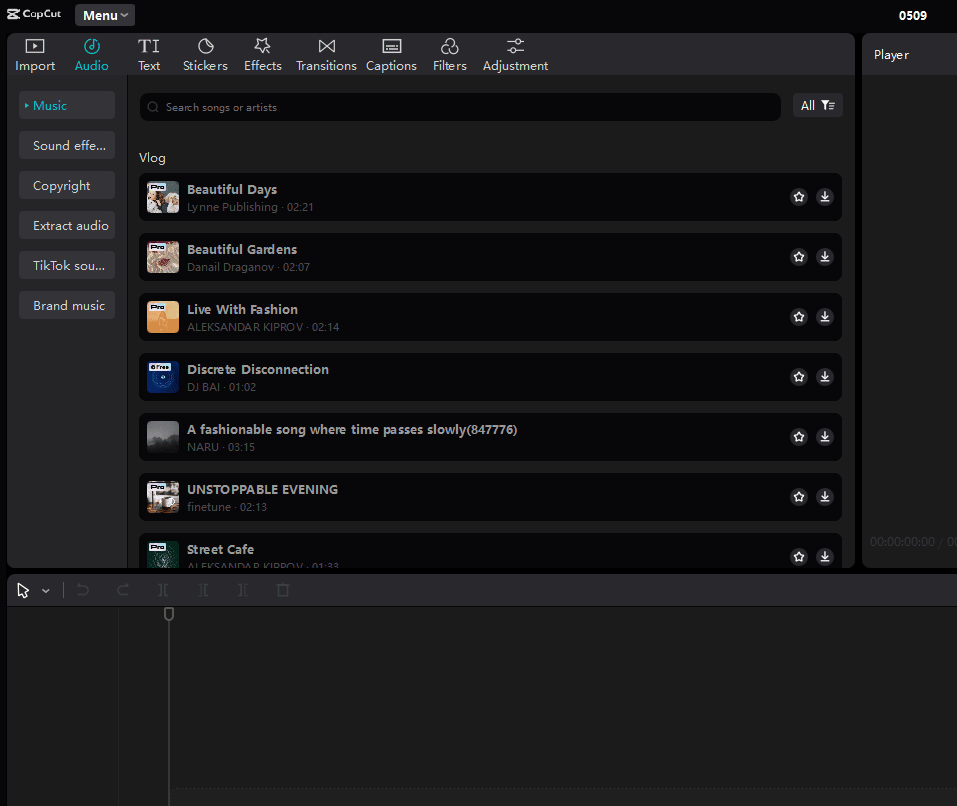
Once you’ve imported your video, you can add audio by clicking on the “Audio” button.
This will open up the audio library, where you can choose from a variety of music, sound effects, TikTok sounds and Extract audio.
Step 3: Adjust the Audio
Once you’ve added audio to your video, you can adjust the volume, fade in and out, and add effects.
To do this, simply tap on the audio track and then use the sliders to make your adjustments.
Step 4: Save Your Video
Once you’re happy with your audio, you can save your video by tapping on the “Export” button.
You can choose to save your video in a variety of formats, including MP4, MOV, and GIF.
How to Add Your Own Voiceover to CapCut on PC
Voiceover is a great way to add narration, commentary, or personality to your videos.
It can help you communicate your message, tell a story, or express your opinion more effectively.

To add your own voiceover to CapCut on PC, you can follow these steps:
- Open the CapCut application on your PC in Windows 10/11.
- Next, create a new project or select a previous video project that you wish to edit
- Import the video into the timeline
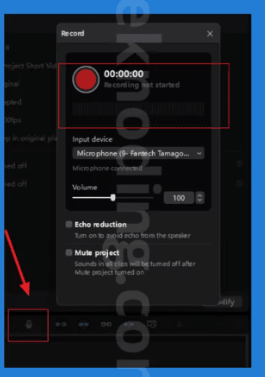
- Select the “Record” option located in the right-hand corner
- Click to begin recording your own voice
- Afterward, you can also customize your voice effects, including Echo, Noise, and Volume
How to Add Your Own Voiceover to CapCut on Mobile
CapCut is a popular video editing app that allows you to add various elements to your videos, including voiceovers.
Here’s a step-by-step guide on how to add voiceover in CapCut Android/iPhone:
Step 1: Launch CapCut and Import Your Video
- Open the CapCut app on your mobile device.
- Tap on the “New Project” button to start a new project.
- Select the video you want to add a voiceover to from your device’s gallery or storage.
Step 2: Access the Audio Menu and Choose Voiceover
- Once the video is imported, you’ll see the video editing interface.
- Locate the menu bar at the bottom of the screen and tap on the “Audio” icon.
- A list of audio options will appear. Select “Voiceover” from the menu.
Step 3: Start Recording Your Voiceover
- Tap on the microphone icon to initiate the voiceover recording.
- Speak clearly and concisely into your device’s microphone.
- You can adjust the recording volume using the slider on the screen.
Step 4: Edit and Refine Your Voiceover
- Once you’re satisfied with your recording, tap on the red stop button to end the recording.
- The recorded voiceover will appear as a track on the audio timeline below the video preview.
- You can drag the edges of the voiceover track to adjust its duration and match it with the video.
- To edit the voiceover, tap on the track and use the tools provided to trim, split, or adjust the volume of specific sections.
Step 5: Save Your Video with Voiceover
- When you’re happy with the voiceover and overall editing, tap on the “Export” button in the top right corner.
- Choose the desired resolution and frame rate for your video.
- Select “Save to Device” and wait for the video to export with the added voiceover.
Tips for Adding Audio to CapCut
Here are a few tips for adding audio to CapCut:
- Use high-quality audio files. The quality of your audio will have a big impact on the overall quality of your video.
- Choose audio that matches the mood of your video. The audio you choose should complement the visuals of your video and help to create the desired atmosphere.
- Use audio effects to enhance your video. CapCut offers a variety of audio effects that you can use to add depth and interest to your video.
- Experiment with different audio tracks. Don’t be afraid to try different audio tracks until you find one that you’re happy with.
Conclusion
Adding audio to CapCut is a simple and easy process. By following the steps in this guide, you can add audio to your videos and create stunning videos that will engage your audience.
How do I import music into CapCut?
CapCut offers several ways to incorporate music into your projects:
- CapCut’s Sound Library:
- Open your CapCut project on a mobile device, such as an iPhone or Android.
- Tap “Audio” at the bottom of the screen.
- Select the “Sounds” tab.
- Browse categories like “Recommended”, or search for specific sounds.
- Tap the sound you want and then the “+” symbol to add it to your project.
- Extracting Audio from Videos
- Add the video containing the audio you want to your project.
- Select the video clip on the timeline.
- Tap “Audio” at the bottom of the screen.
- Select “Extracted” and choose the desired audio track.
How do I insert a voice recording in CapCut?
- Recording directly within CapCut:
- Open your CapCut project.
- Tap “Add Audio”.
- Select “Record” then “Voiceover”.
- Tap and hold the microphone button to start recording.
- Release the button to stop recording.
- Adjust the position and length of the voiceover as needed.
How do I link audio to video in CapCut?
CapCut automatically links audio to your project when you add it. However, here’s how to adjust it:
- Positioning: Drag the audio clip along the timeline to where you want it to start.
- Trimming: Drag the edges of the audio clip to adjust its length.
- Detaching Audio:
- Select the video clip.
- Tap “Audio”.
- Select “Split”. You can now move or edit the audio independently of the video.
How to put Spotify music on CapCut?
Due to music licensing restrictions, you cannot directly import Spotify songs into CapCut. Here are some workarounds:
- Screen recording with audio:
- Play the Spotify song you want.
- Start a screen recording on your device, making sure to include audio.
- Import the screen recording into CapCut and extract the audio.
- Music downloaders:
- Important: Be aware of copyright laws and Spotify’s terms of service before using a third-party app to download music from Spotify.


