Tired of hitting those frustrating file size limits when sharing your videos? There’s an easy way to make them smaller without losing quality.
CapCut has tools to compress videos for sharing on social media, sending in emails or to free up space on your device.
In this article, we’ll show you how to compress videos in CapCut on your computer or mobile phone. Get ready to share your videos without losing quality!
Why Compress Videos in CapCut?
As a CapCut Content Creator or Video Editor, you need to ensure that your video files are within the upload limits of various social media platforms like TikTok, YouTube, and others.
Before uploading, it’s crucial to check the video file size and optimize it if necessary.
Compressing Videos on CapCut for Android/iPhone
- Launch CapCut: Open the latest version of the CapCut app on your Android or iPhone device.
- Create or Select a Project: Choose “New Project” to start a new project or select an existing one.
- Edit Your Video: Make the necessary edits to your video using CapCut’s editing tools.
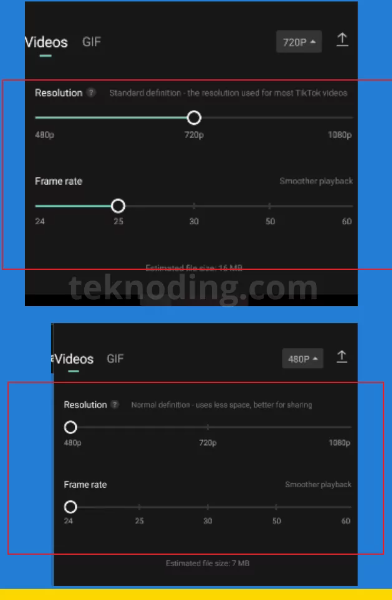
- Access Export Settings: Tap the “720p” option in the top right corner to open the export settings.
- Adjust Resolution: To reduce file size, change the resolution from 1080p to 720p or 480p. File sizes typically range from 26MB for 1080p, 16MB for 720p, and 7MB for 480p.
- Reduce Frame Rate: A higher frame rate results in a larger file size. Consider lowering the frame rate if necessary.
- Export the Compressed Video: Once satisfied with the settings, tap the “Export” button in the top right corner.
- Remove Watermark (Optional): Before exporting, you can remove the CapCut watermark if desired.
- Adjust Aspect Ratio (Optional): You can also modify the aspect ratio of the video before exporting.
Compressing Videos on CapCut for PC/Laptop
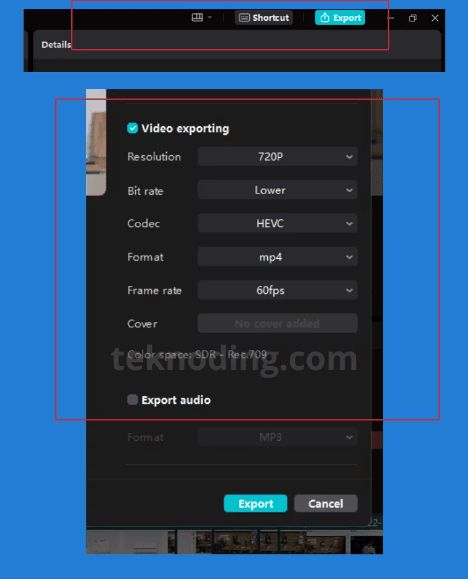
If you’re looking to save space on your device, here is how to use CapCut to compress video:
- Open CapCut on PC/Laptop: Launch the CapCut application on your PC or laptop without using an emulator.
- Edit Your Video: Make the desired edits to your video using CapCut’s editing tools.
- Access Export Settings: Click the “Export” button in the top right corner.
- Reduce Resolution: Under the “Resolution” section, lower the resolution from 1080p to 720p or 480p to reduce file size.
- Adjust Bitrate and Codec: Set the “Bitrate” to a lower value and change the “Codec” to HEVC for further compression.
- Export the Compressed Video: Click the “Export” button again to finalize the compression process.
Additional Tips for Compressing Videos in CapCut
- Trim Unwanted Parts: Thoroughly Review Your Footage Before jumping into resolution changes, analyze your video for any beginning, middle, or end sections that don’t contribute to the core message of the video. Cut these parts to reduce overall length, directly lowering the file size.
- Crop the Video: Be Mindful of Composition If there are areas around the edges of your frame that aren’t essential, use CapCut’s crop tool. Be careful not to crop too tightly, as you might cut off important elements unintentionally. Consider how you’ll use the video (e.g., vertical for TikTok vs. widescreen for YouTube) to guide your cropping decisions.
- Convert to MP4 Format: Stick to the Standard If your video isn’t already in MP4 (.mp4) format, CapCut likely offers a conversion option during export. MP4 is highly compatible across devices and platforms, and its compression technology is efficient at reducing file size while maintaining decent quality.
- Utilize Cloud Storage: Free Up Device Space, Maintain Accessibility Cloud services like Google Drive, Dropbox, or iCloud can be lifesavers for storing edited videos. After compressing a CapCut video, upload it to your preferred cloud storage. This frees up valuable space on your phone or computer and ensures you can access your videos from anywhere with an internet connection.
Bonus Tip:
- Experiment with Compression Settings: Don’t be afraid to test out different combinations of resolution, frame rate, and bitrate adjustments. Preview the results to find an acceptable balance between file size reduction and visual quality that is suitable for your intended use of the video.
Q: How to reduce the size of videos in CapCut?
A: Here’s how to make your CapCut video files smaller:
- Lower Resolution: Change the video’s resolution from 1080p to 720p or 480p. This is the easiest and usually most impactful way to reduce file size.
- Reduce Frame Rate: Select a lower frame rate (e.g., change from 60fps to 30fps) if it’s suitable for your video type.
- Change Bitrate: In the export settings, look for a “Bitrate” option and select a lower value.
- Choose HEVC Codec: If available, switch to the HEVC codec, which is generally more efficient for compression.
- Trim Unnecessary Parts: Cut out any sections of the video that you don’t need.
- Crop: If possible, crop the video to focus on the main subject and reduce the overall image area.
Q: How do I reduce the size of a video (in general)?
A: Beyond CapCut, here are the top ways to reduce video size:
- Dedicated Compression Software: Use tools like Handbrake (free and open-source) or paid options for more detailed control over compression settings.
- Online Video Compressors: Websites like VEED.IO or Clideo offer easy video compression without software installation. Just be aware of any file size limitations on free versions.
Q: Does CapCut reduce video quality?
A: Compressing videos in CapCut, like any compression, almost always involves some loss of quality. The trick is to find a balance between reducing the file size and maintaining an acceptable level of quality. The changes you make to resolution, frame rate, and bitrate will affect how noticeable the quality change is.
Q: How can I compress a video without losing quality for free?
A: Unfortunately, it’s practically impossible to compress a video without losing any quality at all. However, you can minimize the quality loss:
- Start with High-Quality Source: The better quality your original video is, the less noticeable the loss will be after compression.
- Use a Good Compressor: Reputable tools like Handbrake or online compressors with advanced settings will give you more control to preserve quality.
- Experiment: Try different compression settings and preview the results to find the best compromise between file size and visual quality.
Important Note: The degree of compression that’s possible depends on the content of your video. Videos with a lot of detail and movement are harder to compress without noticeable quality loss.
