If you are playing Final Fantasy 7 Remake Intergrade on PC/Laptop, you may not know that you can change the mode from DirectX 12 to DirectX 11.
By changing the mode to DirectX 11, you might be able to make the frame rate (FPS) higher and more stable when you play the game,because the game runs in DirectX 12 mode by default.
There are 2 ways to turn on DirectX 11 mode in the game Final Fantasy 7 Remake Intergrade on PC/Laptop Windows.
You can see the steps below.
How to Enable DirectX 11 Mode on FF7 Remake PC via Epic Games
Here’s how to enable DirectX 11 mode in the PC version of Final Fantasy 7 Remake:
1. Launch the Epic Games Launcher on your PC or laptop running Windows 10/11
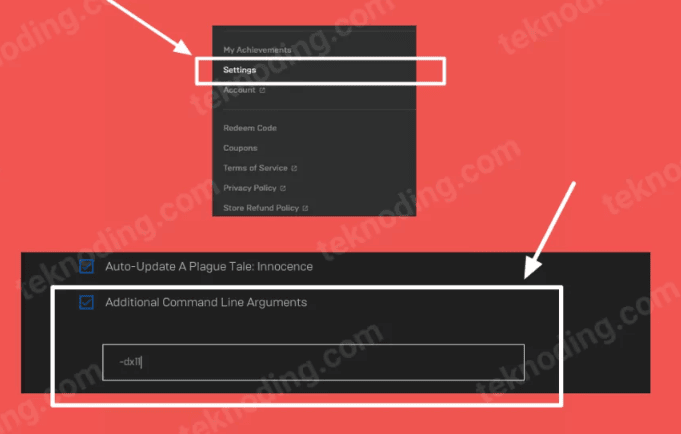
2. Next, click on your profile picture icon in the top right corner
3. Select the “Settings” option
4. Scroll down and expand the menu for the game “Final Fantasy VII Remake Intergrade.”
5. Check the box labeled “Additional Command Line Arguments.”
6. Then, add the following line of code, “-dx11,” as shown in the image above
How to Run Final Fantasy 7 Remake in DirectX 11
To enable DirectX 11 mode through a file explorer, follow these steps:
- Right-click on the desktop shortcut for the game “Final Fantasy VII Remake Intergrade.”
- Choose “Open file location.”
- Navigate to the file location “Final Fantasy VII Remake Intergrade\Engine\Binaries\ThirdParty\EOS.”
- Right-click on the “epic_emu” file and edit it using Notepad.
- Add the line of code “-dx11” to the section that reads “AppName=FFVIIRemakeIntergrade,” making it look like this:
[Settings] ### Application name ### AppName=FFVIIRemakeIntergrade -dx11 ### Language that will be used in the game ### Language=en
- Now, you can save the settings in the file.
- This will activate DirectX 11 mode for the game “Final Fantasy VII Remake Intergrade.
FAQ
Q: Can Final Fantasy VII Remake be run in DirectX 11 mode on Steam?
A: Yes, Final Fantasy VII Remake can be run in DirectX 11 mode on Steam. This mode might be preferable for some users experiencing issues with the default DirectX 12 setting.
Q: How do I enable DirectX 11 mode for Final Fantasy VII Remake on Steam?
A: To enable DirectX 11 mode, follow these steps:
- In your Steam library, right-click on Final Fantasy VII Remake.
- Select “Properties.”
- In the “General” tab, find the “Launch Options” section at the bottom right.
- Type
-d3d11(without quotation marks) in the launch options field.
Alternatively, some users have reported success using -dx11 as the launch option.
Q: Are there any known issues with running Final Fantasy VII Remake in DirectX 12 mode?
A: Some users have experienced performance issues with DirectX 12, including stuttering and instability. Switching to DirectX 11 has been a suggested workaround for these issues.
Q: Is there any additional step required after switching to DirectX 11 to improve game performance?
A: Apart from switching to DirectX 11, it is also suggested to turn off dynamic resolution scaling, which is on by default. This requires a mod, as there’s no in-game menu option to toggle it off. Furthermore, some users have recommended forcing VSync for the game through the video card’s control panel to eliminate stutters.
Q: Does running the game in DirectX 11 mode affect the game’s visuals or performance?
A: While DirectX 12 might offer better performance and visuals on some systems, users who have switched to DirectX 11 mode report stable gameplay, sometimes opting for this mode due to compatibility or performance issues with DirectX 12. The impact on visuals and performance may vary based on your system’s hardware and settings.
Q: What should I do if I still experience performance issues after switching to DirectX 11?
A: If performance issues persist, consider adjusting other game settings such as resolution, graphic quality, and frame rate limits. Additionally, ensure your graphics drivers are up to date and that your system meets the game’s hardware requirements.
That’s the information about how to run the game Final Fantasy 7 Remake PC with Direct X 11 Mode. I hope it can help you as a reference.